How to Draw a Cat in Watercolor: A Step by Step Guide
Learn how to draw a cat in watercolor with a nine-stage walkthrough covering pencil bones, loose ink edges, and warm washes for soft tabby fur.
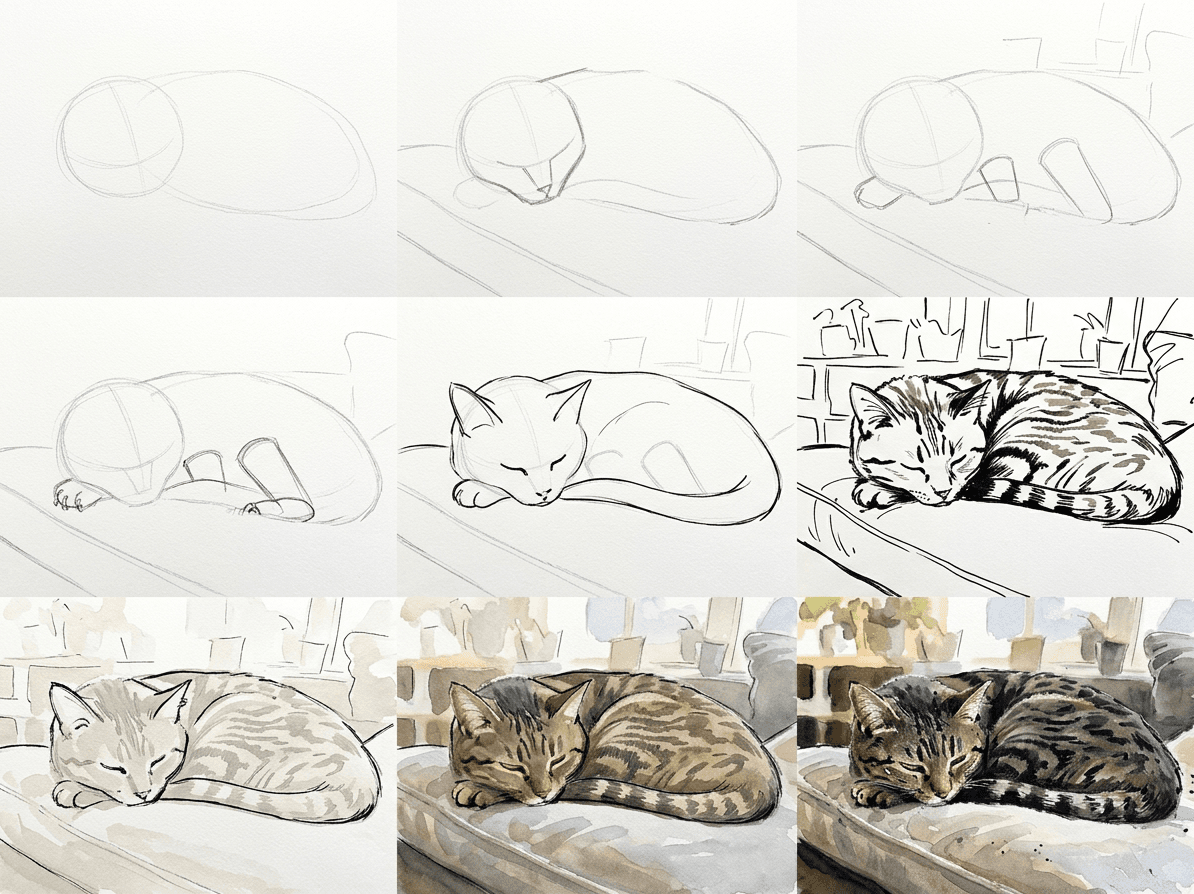
A tabby curled on a cushion is one of the friendliest subjects you can pick up this weekend, and watercolor is the right medium for soft fur and warm afternoon light. This guide shows how to draw a cat in watercolor using a beginner-safe nine-stage workflow: pencil bones first, ink edges second, layered washes last. The pigment soaks into the paper the way light soaks into fur, and a flexible ink line catches the stripes without forcing you to fuss over every hair. By the end you will have a loose ink and wash cat sketch that feels alive on the page.
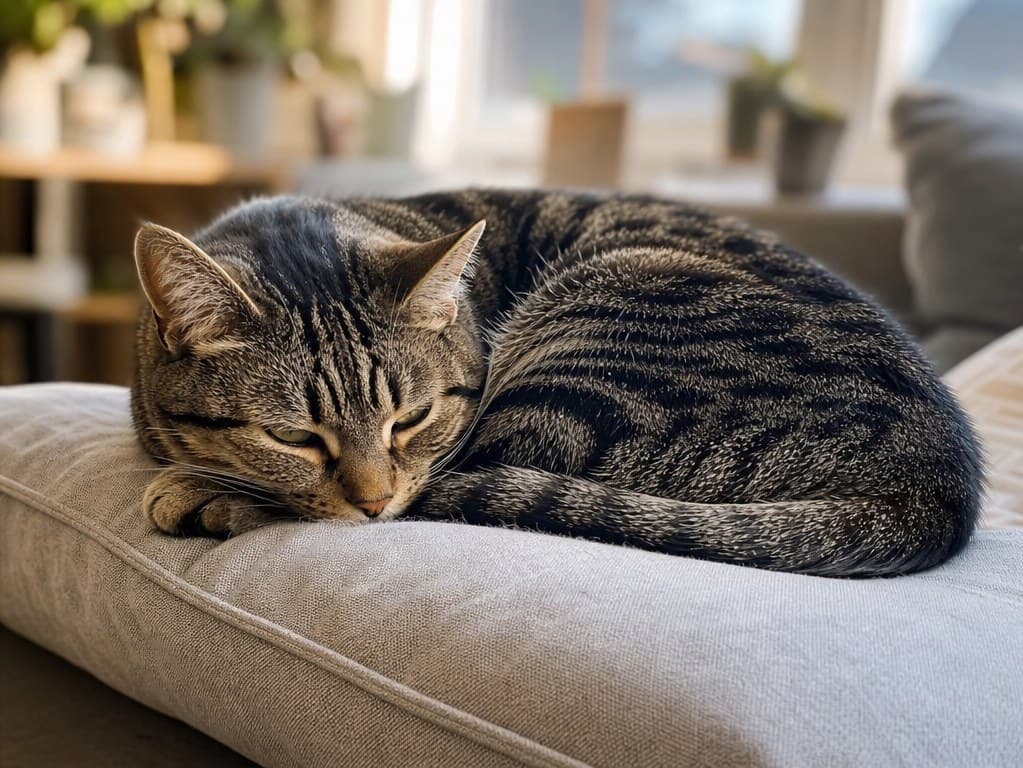
What you will need
Your kit stays small. A 2H or HB pencil handles the layout lines, a waterproof fineliner around 0.3mm pulls the ink edges, and a slightly thicker 0.5mm pen builds the heavier accents under the chin and tail. Three watercolor pans are enough: a warm yellow ochre, a rusty burnt sienna for the tabby stripes, and a deep neutral such as sepia or burnt umber for the shadow notes. A round size 6 brush carries plenty of wash, and a size 2 helps you place fine fur ticks at the end.
Paper matters more than people expect. Use 140 lb cold press watercolor paper if you can get it. The slight tooth holds the washes flat and forgives a heavy brush. Hot press feels smoother under the fineliner but blooms more, so beginners usually pick cold press for steady results. Tape your sheet on all four sides to a stiff board so the paper does not buckle when it gets wet.
Set up two water jars and a folded paper towel. One jar washes the brush clean, the other rinses it before reloading color. The paper towel sits at your dominant hand so you can tap the brush dry between layers. Keep your reference open at the same orientation as your paper, and light the reference as well as the page.
Why we break this into nine stages
Painting a cat from scratch tempts the brain to skip ahead to whiskers and stripes. The first ink line lands while the proportions are still wrong, and the wash dries on top of a stiff pose. The nine-stage method slows that reflex. Each pass isolates one decision: body masses, head, front limbs, back limbs, fur silhouette, ink line, palest wash, mid-tone color, and shadow accents. When you draw a tabby cat sketch step by step, you fix errors in pencil rather than after pigment has stained the page. The same logic drives any reliable easy cat painting for beginners.
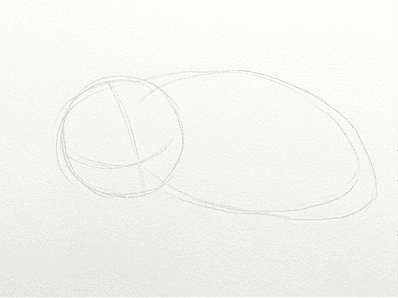
Start with the body and head as two soft ovals. The body oval lies on its long side because the cat is curled, and the head oval sits at one end, slightly overlapping the body. Tilt the body so the spine reads as a gentle banana curve rather than a flat brick. Keep every line feather light. These are bones, not the drawing. Your top priority is the overall stance and the relationship between the two ovals, since that sets where the neck will tuck.
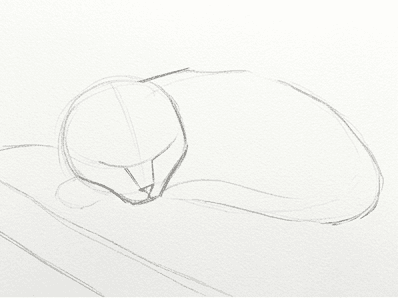
Tuck a short neck between the two ovals and block the muzzle as a small rounded wedge attached to the front of the head. A curled cat hides most of its neck, so this connection is barely visible from the side. Mark a centerline down the muzzle and a horizontal line for the eyes. These two reference lines anchor every facial feature you place later. The closed-eye look reads at a glance only if both eye marks sit on that same horizontal line.
Drop the front legs from the chest mass. In a curled pose, the front paws often sit tucked under the chin, so block them as a single rounded bundle rather than two separated tubes. The far front paw is usually hidden, while the near one peeks out as a small wedge. A tabby looks at ease when the front paws read as one warm pillow under the head, not two stiff posts.
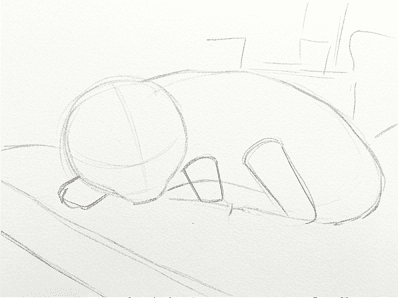
Now build the back legs and the haunches. The thigh is a large rounded mass that springs from the hip, then tucks into a thinner shank that disappears under the belly. The far hind leg is partly hidden, but sketch it anyway so you can erase the hidden contour later. A curled cat reads as round only when the haunch is clearly the heaviest part of the silhouette. The line from hip to heel should bend in a soft Z, not run as a straight column.
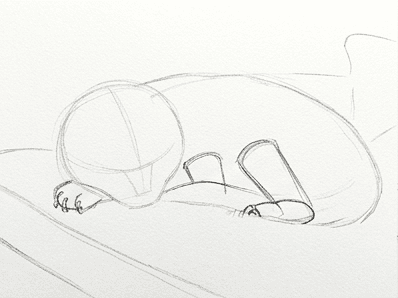
Add the small triangular ears on top of the head, leaning slightly outward. Draw the tail as a long, gently curved cylinder that wraps around the body and ends near the front paws. Trace the fur contour with small, broken pencil ticks rather than a continuous line. Fur reads better when the edge breaks open at the chest ruff, the elbow tuft, and the belly. The brush will handle individual hairs later with a few well-placed marks.
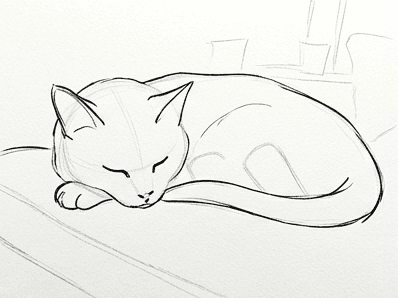
Switch to your fineliner and lay a relaxed ink line over the pencil silhouette. Vary the pressure: heavier at the spine and the tail base, lighter under the belly, broken at the fur tufts. Trace the inner facial features lightly. Closed eyes get a single soft curve, the nose a small triangle, and the mouth a faint downward line. Wait two minutes for the ink to dry, then lift the pencil under it with a kneaded eraser. The result is a loose ink and wash cat ready for color.
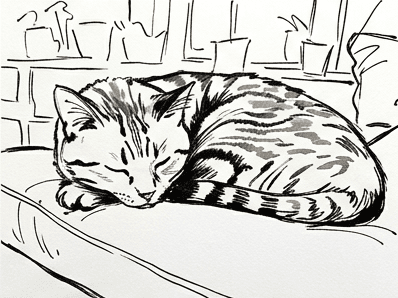
Mix a very pale wash of yellow ochre with a touch of burnt sienna and a lot of water. Wet the body of the cat with clean water, avoiding the white chest patch and the inside of the ears, then float the pale wash across the wet area. Tilt the board so the pigment pools toward the back. Let it dry fully. This warm undercoat is the afternoon light every later layer reads against, so resist the urge to push it darker.
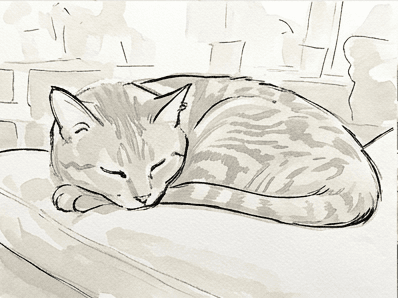
Build the mid-tone burnt sienna in two or three layers. Drop the color along the back, the top of the head, the shoulder, and the haunch. Use a softer, more diluted version on the cheeks and the legs. Let each layer dry before stacking the next. This is the moment a tabby cat sketch finds its body, since the rusty ridges define the round volume of the curl even before any stripes appear.
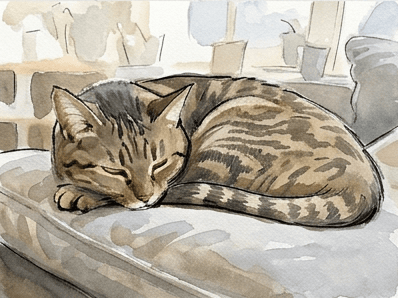
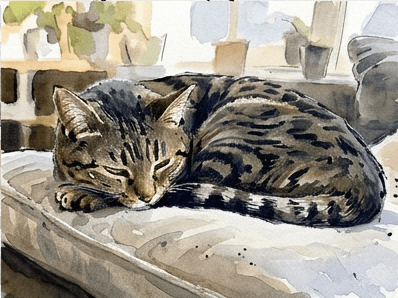
Switch to a small brush loaded with sepia or burnt umber. Drop the tabby markings as short, slightly curved strokes that follow the round form of the body, never flat across it. Stripes are denser on the back, the haunch, and the tail, and lighter along the belly. Finish with a couple of dark ink accents at the closed eyes, the nose, the inner ears, and the soft cast shadow under the cushion. Step back and squint. The brightest highlight, the deepest stripe, and the warm mid-tone should all read at once.
Common mistakes
Flat stripes are the most common failure in a tabby painting. If the markings run as straight bars, the body loses its volume and the cat looks like a striped log. Recover this by curving each stripe over the nearest round mass: shoulder, ribs, hip, and tail. A stripe is a band wrapping around a cylinder, not a line painted on a flat sheet.
A stiff curl ranks second. Beginners often draw the spine as a flat brick with legs glued to the sides, which makes the cat read as a loaf rather than a relaxed sleeper. Erase the spine, redraw it as a gentle banana curve, then tuck the front paws under the chin. Even a small bend restores the soft pose.
Muddy color happens when each wash hits the page before the previous one is dry. Walk away and let the painting rest flat for ten minutes. If a layer is already muddy, lift the wet pigment with a clean damp brush and a paper towel before it sets. The lifted patch dries lighter and gives you a second chance.
Heavy black ink for the stripes kills the warmth. Pure black sits cold against the rust orange and turns the cat into a cartoon. Mix your darks from burnt umber and a tiny touch of sepia or indigo. The dark stays brown and the warm tones below it still glow through.
Finally, too much face detail. Closed eyes do not need eyelash marks, and the mouth on a sleeping cat is almost invisible. If you find yourself painting individual whiskers, stop and squint at the reference. A sleeping tabby reads first as a warm shape and second as a face, so the brush spends most of its time on the body.
Practice prompts
Try the same workflow on a different cat. A grey shorthair keeps the ink-and-wash logic but trades rusty mid-tones for cool slate washes. A long-haired ragdoll keeps the warm tones but adds a soft fur halo, which tests how loosely you can break the silhouette without losing the body underneath.
Repaint today's tabby from a new angle. Sketch the same cat from above looking straight down, or from behind with the tail curled around. The proportional rules stay the same, but the overlapping shapes test how well you can rebuild a curled animal from imagination. A new angle also forces you to rethink where the warm light falls.
Time yourself. Set a kitchen timer for thirty minutes and run the entire nine-stage workflow at half size on a small piece of paper. Speed work loosens the brush, exposes the steps you secretly rush, and turns the routine into a reflex rather than a checklist.
If you want this same nine-stage workflow on your own photos, the Learn to Draw app on iOS and Android runs the exact pipeline for any reference you upload. Snap a picture of your own cat, a friend's pet, or a magazine spread, and the app returns the same construction stages you walked through today. It is a fast way to lock the order of operations into muscle memory while you keep your sketchbook open beside you.

